How to Create and Customize a Survey in Starred
Learn how to create your own surveys, add questions, and customize the style, language, and structure of your survey.
Creating a New Survey
- Go to your Survey Overview
- Click Create new survey in the top right corner.

You’ll now have two options:
🧩 Option 1 — Use a Template
Browse our Template Gallery to pick a prebuilt survey for different journey types (e.g., Hired, Rejected, Employee Engagement).
- You can preview any template before adding it to your account.
- After adding, you can fully edit and customize it.
- Available templates depend on your Starred plan and journey setup. If you can't see a template you need, you can reach out to your Customer Success Manager.
✏️ Option 2 — Create from Scratch
Click **Create from scratch **to start a new survey manually.
- Add a title, select a language, and choose a journey type.
- You’ll then be able to add questions and blocks.
Customizing the Header
To personalize your survey header:
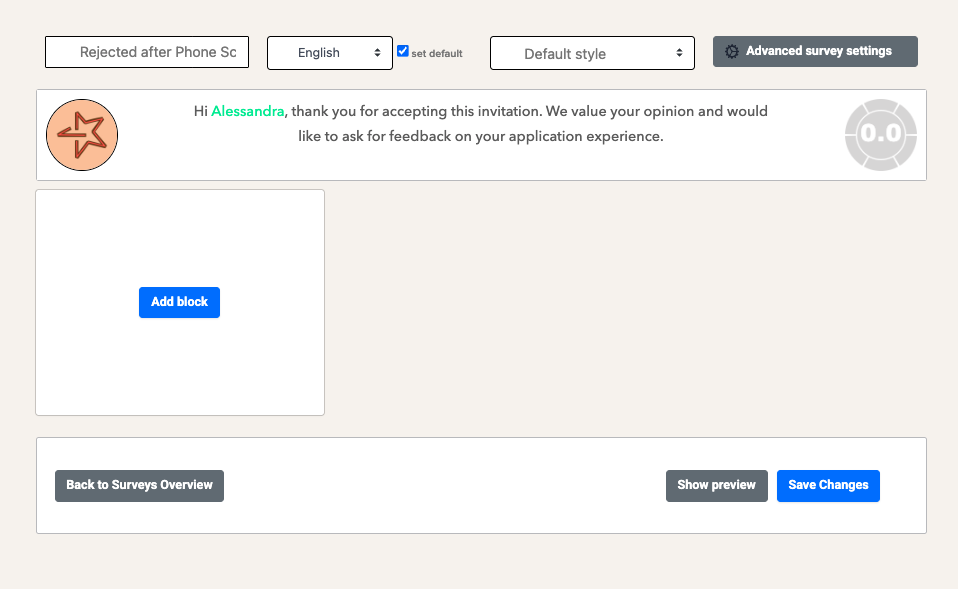
- Click the header text to edit it.
- To make the survey more personal, include the respondent’s first name by adding a placeholder: %firstName.

Adding Questions to Your Survey
Surveys in Starred are built from question blocks, each containing one or more questions of the same type.
📌 Key facts
- You can have up to 6 question blocks per survey.
- Each block can include 1–5 questions, depending on the question type.
- Blocks can be created from scratch or imported from another survey.
To add a block:
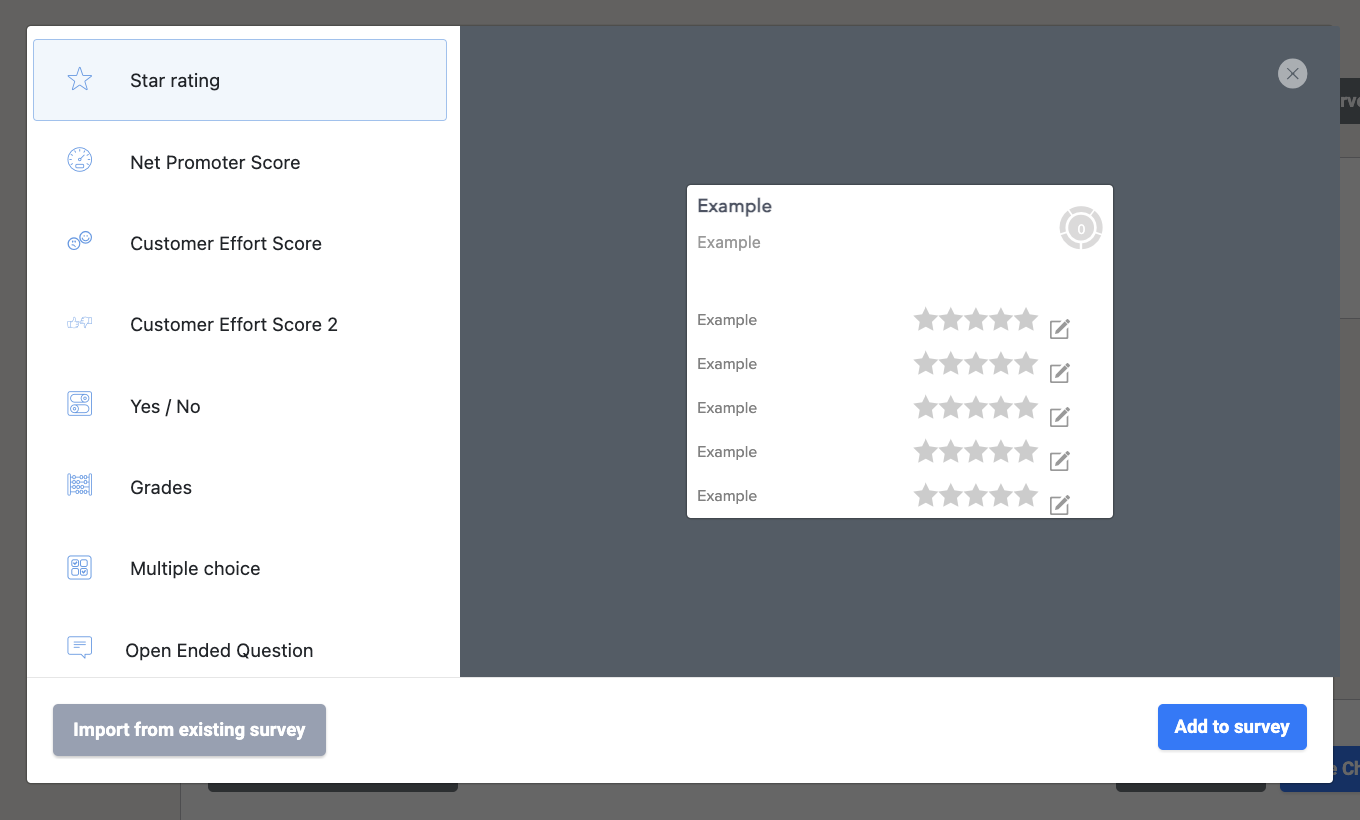
- Click Add Block.
- Choose your question type.
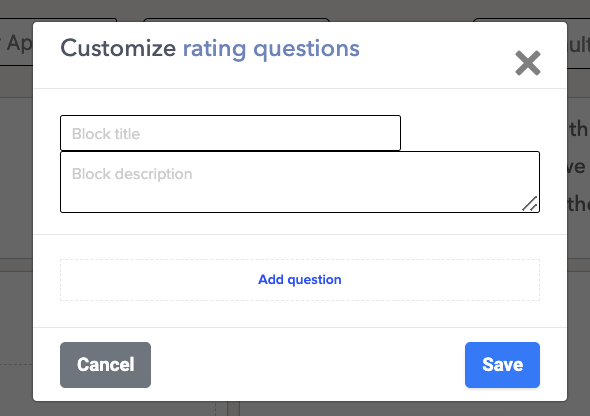
- Add a title and description for the block.
💡 Or click Import from existing survey (bottom left) to reuse a block you already created.

Creating a question block
Each question block needs:
- Block title (max 45–50 characters)
- Block description (max 200–250 characters)

You can then add up to five questions per block, each with:
- Question title — main topic (max 75 characters)
- Question description — supporting detail (max 250 characters)
Tip: not all question blocks can support up to 5 questions. Depending on the question type you chose, you may add between 1 and 5 questions. More about question types below.

💬 Question Types Overview
Starred offers several question formats to fit your feedback needs:
Net Promoter Score
Measures loyalty using a 0–10 scale (from “very unlikely” to “very likely”).
The NPS follow-up question is fixed and cannot be removed. 📘 Learn more about NPS →
Star rating
Respondents rate with stars (0.5–5 stars, or N/A).
Star ratings contribute to your average rating dashboard metric, converted to a 1–10 scale.
Notes: 0-star responses are excluded from averages (they count as skipped).
Grades
Respondents rate on a 1–10 scale.
These scores are averaged in your dashboard alongside Star ratings.
CES and CES 2.0
Measure Customer Effort Score (how easy or difficult an experience was).
- CES: Original version (negative phrasing, 5-point scale).
- CES 2.0: Positive phrasing, 7-point scale with updated visuals.
Yes/No
Binary response grid for quick feedback.
Respondents can also leave a comment or select N/A if not applicable.
Multiple Choice
Choose one or more answers from a list (1–5 choices).
You can allow multiple selections using the dropdown menu.
Open-ended
Respondents can leave free-text feedback (max 200–250 characters).
You can include one or two open-ended questions per block.
Customizing youy survey
Make your surveys more personal by using custom fields — data pulled from your workflow or invitation file (e.g., job title, recruiter, department).
To use a custom field inside your survey text:
- Open the question.
- Type @ followed by the exact field name (case-sensitive).
- Example: @JobName
📘 Learn more about custom fields and properties →
Adding Survey Languages
Translate your survey into multiple languages:
- Click the current language →** Language Settings**.
- Add your desired languages → Save.
Survey questions are not translated automatically.
You must enter translations manually for each question.
📘 How to translate your survey →
Changing Survey style
To apply a background or theme:
- Add the desired style in your Company Settings.
- Choose the style from the dropdown menu.
- Click Save Changes.
Advanced Survey Settings
Access advanced options by clicking the settings gear at the top right:

Here you can configure:
- Anonymity settings
- Cooling down period
- Other advanced parameters
💬 Need help?
If you have questions about survey setup, question design, or styling, contact our Support Team — we’re happy to help!
Updated 4 months ago
